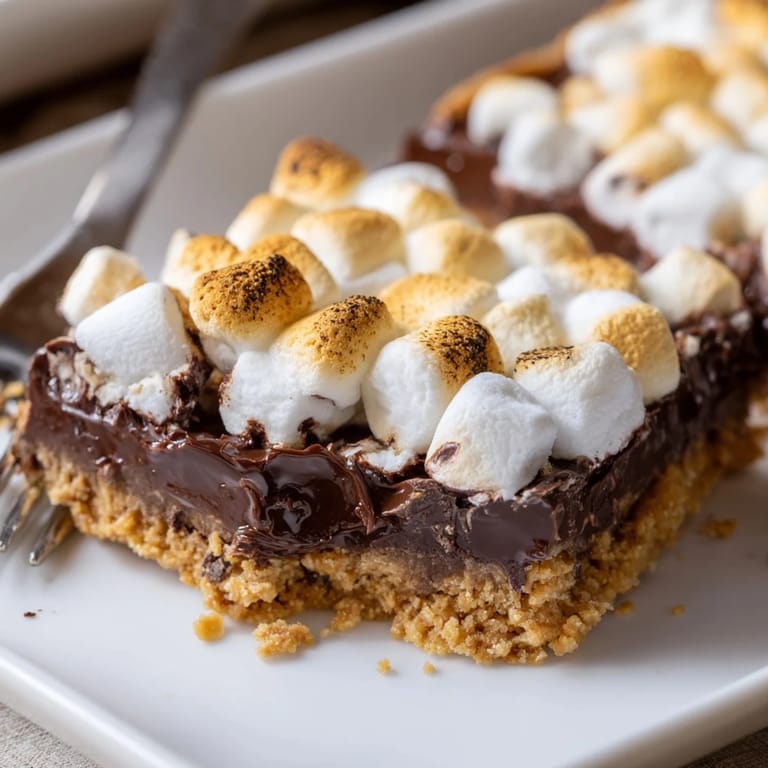
 Pin it
 My apartment smelled like a campfire last Sunday, minus the actual campfire part. I'd been craving that sticky sweet memory of childhood summers but had zero patience for building fires or hunting down clean sticks. These bars became my twenty-minute solution to nostalgia, and honestly, they might be better than the original.
My roommate walked in while I was pressing the graham cracker crust into the pan and immediately started hovering like a hungry shark. She ended up burning her fingers on the first bar because she literally could not wait for them to cool. That's the kind of impatience these desserts inspire.
Ingredients
- Graham cracker crumbs: The foundation of everything smores, crushed into fine sandy bits for that classic crunch
- Unsalted butter: Melted and golden, binding the crust together into something that holds together when you bite
- Granulated sugar: Just enough sweetness to make the crust sing without competing with the toppings
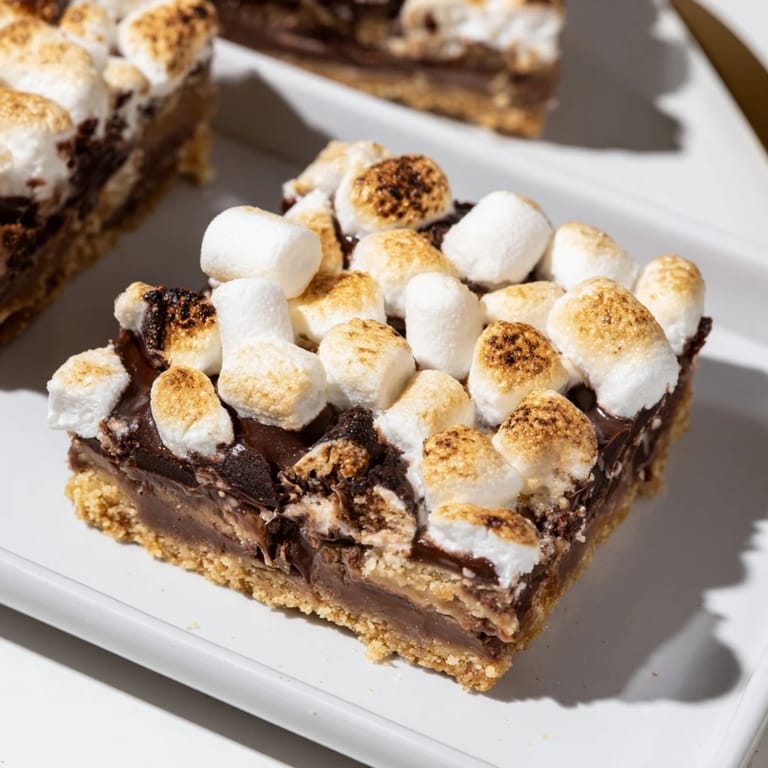
- Semi-sweet chocolate chips: Spread into a melty layer that bridges the gap between crust and marshmallow
- Mini marshmallows: The crown jewel that puffs up golden and irresistible in the oven's heat
Tired of Takeout? 🥡
Get 10 meals you can make faster than delivery arrives. Seriously.
One email. No spam. Unsubscribe anytime.
Instructions
- Prepare your canvas:
- Heat your oven to 350°F and line an 8x8-inch pan with parchment paper, letting the edges hang over like a little sling for later.
- Build the base:
- Mix graham crumbs, melted butter, and sugar until everything's evenly coated and smells like buttery heaven.
- Press it down:
- Firmly pack the mixture into your prepared pan, creating an even layer that will support all the gooey goodness ahead.
- Set the foundation:
- Bake for 8 minutes until fragrant and set, then remove from oven to start the chocolate transformation.
- Add the chocolate:
- Scatter chocolate chips over the warm crust and return to oven for 2 minutes until they're shiny and soft.
- Spread it smooth:
- Gently swirl the softened chocolate into an even layer with your spatula, being careful not to disturb the crust beneath.
- Crown with marshmallows:
- Arrange mini marshmallows across the chocolate, pressing gently so they stick but still have room to puff up beautifully.
- Golden perfection:
- Bake for 10 to 12 more minutes until marshmallows are golden brown and toasty on top.
- Patience pays off:
- Cool completely in the pan, then chill for an hour for those picture-perfect clean cuts.
- Serve it up:
- Use your parchment sling to lift the whole glorious slab out, then slice into sixteen irresistible bars.
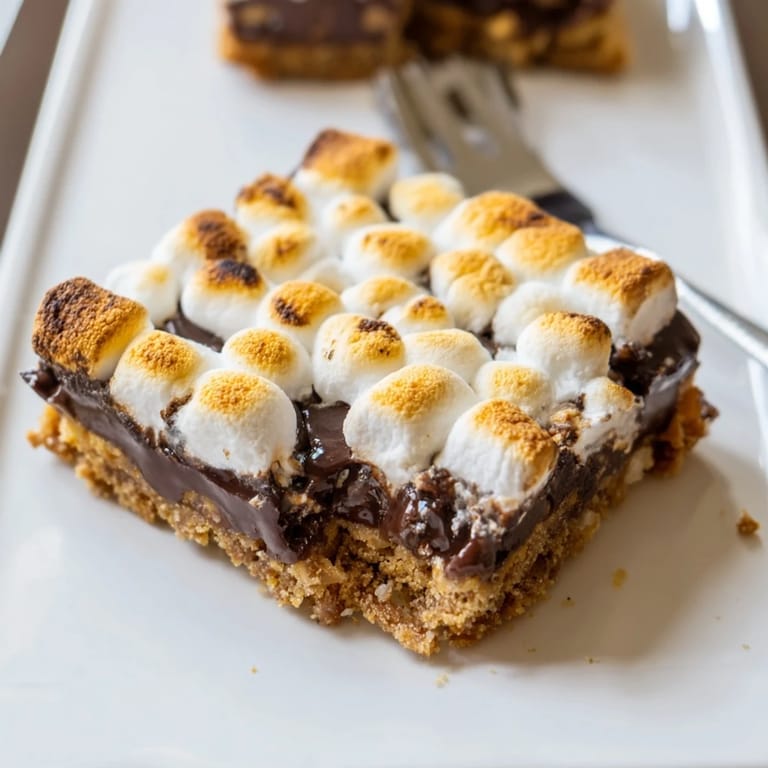 Pin it
 I brought these to a potluck and watched three grown-ups fight over the last corner piece. Something about that combination of textures brings out the inner child in everyone.
Getting That Golden Toast
If your marshmallows aren't getting quite golden enough in the oven, hit them with the broiler for thirty seconds. Watch like a hawk though, I once walked away for literally one minute and came back to charcoal treats.
Make-Ahead Magic
These bars actually taste better the next day when the flavors have had time to become best friends. Store them in an airtight container and they'll stay soft and gooey for up to three days, assuming they last that long.
Serving Suggestions
Serve them slightly warmed with a drizzle of salted caramel if you really want to make people lose their minds. A scoop of vanilla ice cream melting into a warm bar is basically dessert nirvana.
- Dip the bottom half in melted chocolate for next-level presentation
- Sprinkle flaky sea salt over the marshmallows before baking
- Try crushing graham crackers over the top for extra crunch
 Pin it
 These bars turned my regular Tuesday into something worth celebrating. Sometimes you need a little chocolate-marshmallow magic to make the week feel complete.
Recipe FAQs
- → Can I make these ahead of time?
Yes, these bars keep well for up to 3 days when stored in an airtight container at room temperature. For longer storage, refrigerate for up to a week. The texture remains wonderfully gooey, though the marshmallow topping may become slightly less crisp over time.
- → Why should I chill before cutting?
Chilling for 1 hour allows the chocolate and marshmallow layers to set completely, making it much easier to get clean, even slices. The bars hold their shape better and you'll get those perfect restaurant-quality squares. If you're in a rush, 30 minutes in the freezer works too.
- → Can I use different types of chocolate?
Absolutely! Semi-sweet provides a classic balance, but milk chocolate makes them sweeter and more kid-friendly. Dark chocolate (60-70%) adds sophisticated depth and cuts through the sweetness. For extra indulgence, try mixing milk and dark chocolate chunks.
- → What if I don't have an 8x8 inch pan?
A 9x9 inch pan works well—you'll get slightly thinner bars that cook faster, so reduce the final baking time by 2-3 minutes. For a 9x13 inch pan, double all ingredients and expect the bars to be thinner; adjust baking time accordingly.
- → Can I make these gluten-free?
Yes! Simply substitute the graham cracker crumbs with gluten-free graham-style crackers or crush gluten-free vanilla cookies. Ensure your chocolate chips and marshmallows are certified gluten-free, as some brands use facilities with wheat cross-contamination.
- → How do I get the marshmallows extra toasted?
After baking, switch your oven to broil for 30-60 seconds—watch closely as marshmallows go from golden to burnt quickly. Alternatively, use a kitchen torch for precise control and that authentic campfire charred flavor and appearance.